The Website Setup Wizard creates a starter version of your campaign website. It adds basic campaign details, starter pages, navigation, design defaults, donation options, social links, and footer information.
The wizard gives you a useful starting point so you do not have to begin with a blank website. You can review and change the resulting content and settings afterward.
Custom-design customers: If Online Candidate is preparing a custom design or mockup for you, do not run the Setup Wizard unless you have been instructed to do so. Wait until you are contacted about reviewing your design.
Choose whether to run the wizard
When you first log in, the Set Up Your Campaign Website screen offers two choices:
- Continue to Setup Wizard — Enter your campaign information and let the wizard create a personalized starter website.
- Skip and Go to Dashboard — Go directly to the Dashboard and use default starter content.
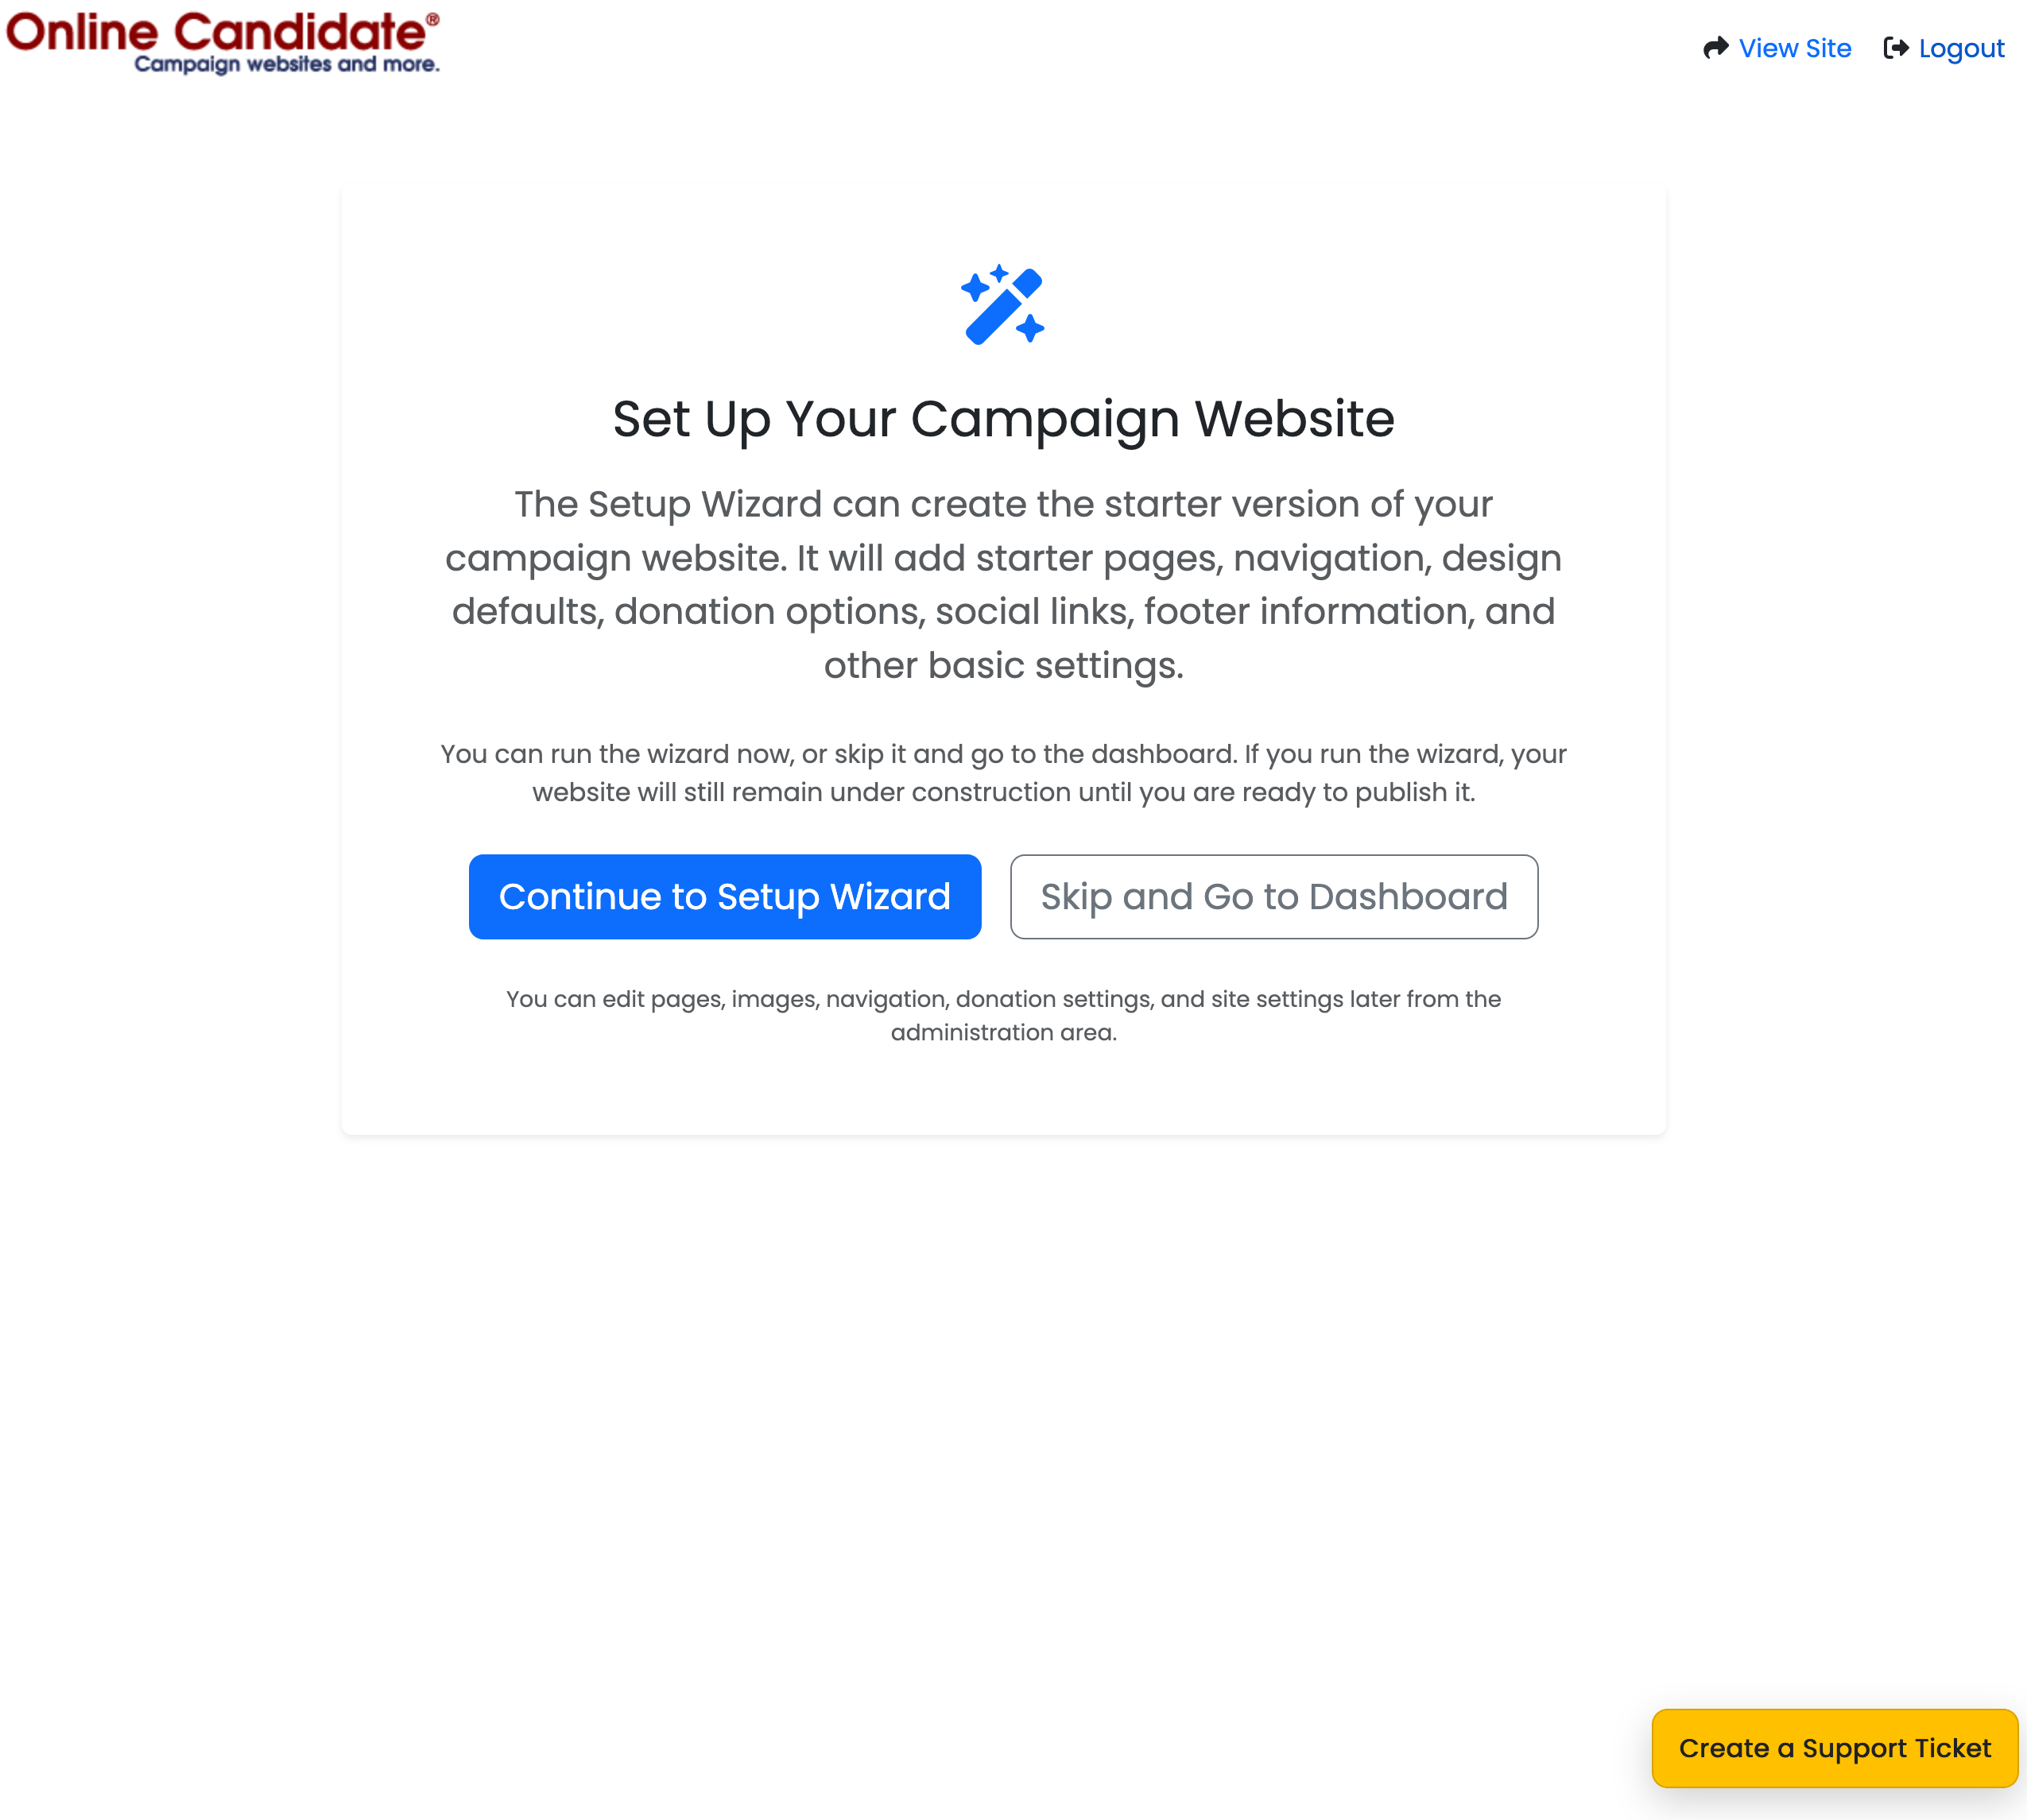
Your website remains under construction with either choice. Public visitors will continue to see the under-construction page until you are ready to publish the website.
Run the Setup Wizard
-
Select Continue to Setup Wizard.
-
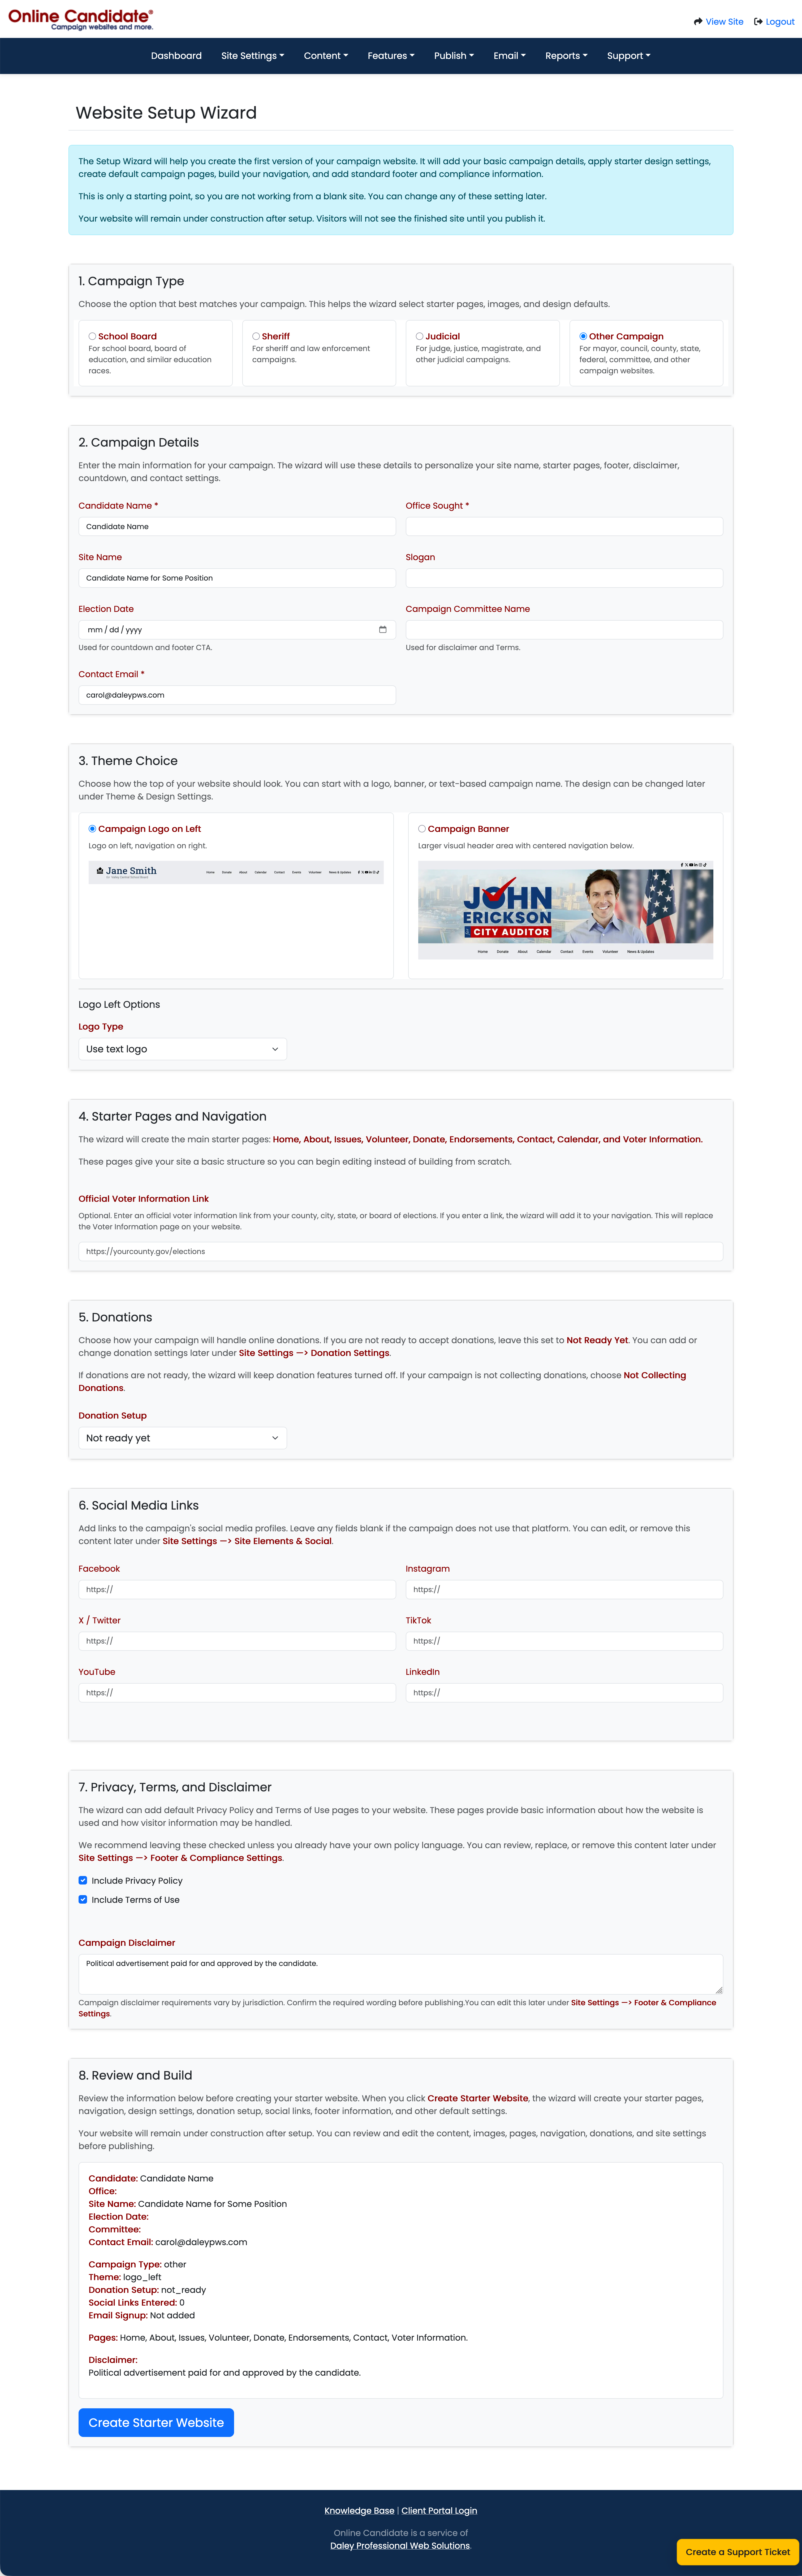
Under Campaign Type, choose the option that most closely matches your campaign:
- School Board
- Sheriff
- Judicial
- Other Campaign
The campaign type helps the wizard select appropriate starter pages, images, and design defaults.
-
Under Campaign Details, enter the requested information about your campaign.
Required fields are marked with an asterisk. Enter:
- Candidate Name
- Office Sought
- Site Name
- Slogan, if applicable
- Election Date, if known
- Campaign Committee Name
- Contact Email
The wizard uses these details to personalize the site name, starter pages, footer, disclaimer, countdown, and contact settings. The election date is used for the countdown and footer call to action. The committee name is used in the disclaimer and terms.
-
Under Theme Choice, select the initial header arrangement:
- Campaign Logo on Left — Displays the logo on the left and navigation on the right.
- Campaign Banner — Displays a larger visual header with centered navigation below.
If you choose Campaign Logo on Left, use Logo Type to choose whether the starter design uses a text logo or an uploaded logo. Theme and branding settings can be changed later.
-
Review Starter Pages and Navigation.
The wizard creates these starter pages:
- Home
- About
- Issues
- Volunteer
- Donate
- Endorsements
- Contact
- Calendar
- Voter Information
These pages provide a basic structure that you can edit later.
Optionally, enter an Official Voter Information Link from your county, city, state, or board of elections. When a link is provided, the wizard adds it to the navigation in place of the starter Voter Information page.
-
Under Donations, choose how the campaign will handle online contributions.
Available choices include an external donation page, Raise The Money, PayPal, Not Ready Yet, and Not Collecting Donations.
- Choose Not Ready Yet if the donation service will be configured later.
- Choose Not Collecting Donations if the campaign will not accept online contributions.
Donation settings can be added or changed later under Site Settings → Donation Settings.
-
Under Social Media Links, enter the full profile URL for any network used by the campaign:
- X/Twitter
- TikTok
- YouTube
Leave a field blank when the campaign does not use that platform. Social links can be edited or removed later under Site Settings → Site Elements & Social.
-
Review Privacy, Terms, and Disclaimer.
- Leave Include Privacy Policy selected to create a starter Privacy Policy page.
- Leave Include Terms of Use selected to create a starter Terms of Use page.
- Review the Campaign Disclaimer and replace it with the wording required for your campaign.
The supplied policies are starting content and do not replace legal advice. Privacy, terms, and disclaimer requirements vary by jurisdiction. Confirm the required wording before publishing the website.
-
Under Review and Build, check the summary carefully.
The summary includes the campaign details, selected campaign and theme types, donation choice, social-link status, pages to be created, and disclaimer.
-
Select Create Starter Website.
A confirmation warns that the wizard may replace starter pages, navigation, theme settings, donation settings, slider, countdown, and footer content. Confirm only after reviewing the information.
The wizard is intended for the initial website setup. After it has been completed, the setup page displays a message confirming that the wizard has already been run.
What the wizard creates
The starter website may include:
- Campaign details and site identity
- Starter pages and content
- Website navigation
- Initial design settings
- Header or hero content
- Donation settings
- Social-media and site-wide elements
- Footer and compliance information
These are starting settings. Review all generated content carefully and replace sample or placeholder information before publishing the website.
What to do after completing the wizard
After the wizard finishes:
- Select View Site to review the starter website.
- Edit the starter pages and replace placeholder content and images.
- Review Theme & Design Settings.
- Review the header or Hero Slider.
- Confirm Donation Integration settings.
- Add social links and other items under Site Elements & Social.
- Review the disclaimer, privacy policy, terms, and other Footer & Compliance settings.
- Review the website navigation.
- Preview the complete website before publishing it.
[Insert screenshot: Setup Wizard completed and next steps]
Your website remains under construction after the wizard is completed. It will not become publicly available until under-construction mode is turned off.
If you skip the wizard
Selecting Skip and Go to Dashboard creates the website with default starter content and opens the Dashboard.
You can then set up the website manually:
- Update the site name, campaign details, contact email, and under-construction settings.
- Configure your donation service.
- Edit the starter pages.
- Add social-media links, call-to-action buttons, and email signup code.
- Review the navigation.
- Preview and publish the website when it is ready.
[Insert screenshot: Dashboard after skipping the Setup Wizard]
Troubleshooting
The wizard says it has already been completed
The Setup Wizard is used for initial setup. Use the administration menus to change pages, navigation, design, donation settings, social links, and other website options after the initial setup.
I selected the wrong campaign type
Complete the setup, then review the generated pages, images, and design settings. These items can be edited individually from the administration area.
I skipped the wizard
The site still contains default starter content. Use the setup checklist displayed on the Dashboard to customize it manually.
Will running the wizard publish my website?
No. The website remains under construction after setup. Review and preview it before turning off under-construction mode.
Related articles
- Review the Website Dashboard
- Update General Site Settings
- Choose a Website Header Layout
- Create and Edit Website Pages
- Preview and Publish Your Website
Internal publishing note: The full wizard screenshot displays a real-looking contact email address. Replace or obscure it before publishing the screenshot in the public knowledge base.